Jump To: Support > KB > UniFi > DNSConfig
Configuring your DNS server to allow automatic installation of Access Points
New UniFi access points will attempt to automatically connect to a controller called unifi. If you are using our cloud-hosted service, you will not have a controller on your network called that.
To allow access points to be automatically configured, create a CNAME record on your DNS server for unifi that points to either our cloud-hosted server or a local UniFi Gateway.
Firstly, you should check to see if you have direct access to our cloud-hosted service. If you do, you should point the CNAME to unifi.ptlnet.com. If you do not have direct access, you need to install the UniFi Gateway Service on one of your server and point the CNAME to the name of that server.
If you have no control over your DNS server (which is only likely if your devices connect straight to the Internet and no other local resources), you will need to configure your access points manually. If you do have a local DNS server, but you are unable to configure a CNAME on it (for instance, it is an ADSL router), you may be able to add an A record pointing to 80.71.28.11.
For a Windows DNS server, follow these steps:
- Open DNS on Administrative Tools
- Expand the tree on the left, go to Forward Lookup Zones and then select your internal domain name.
- In the right-hand panel, right click and choose New Alias (CNAME)...
- Enter
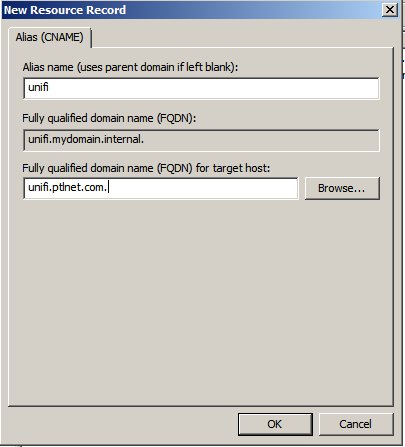
unifiin the Alias name box at the top - Enter either
unifi.ptlnet.com.or the full name including DNS domain of your gateway (e.g.fileserver.myschool.internal.) server in the Fully qualified domain name (FQDN) for target host: box at the bottom. N.B. Note there must be . at the end:
- Click OK
- At a command prompt, try to
ping unifiand check the correct name and address is resolved:


