


Jump To: Support > KB > ThinIT > FirmwareUpdate
Updating ThinIT Firmware
ThinIT can be updated between minor release versions free of charge (i.e. version 2.xx to a later 2.xx). If you own a NetManager server, then ThinIT updates will automatically be downloaded as part of the NetManager updates and the update paths, etc. are all pre-configured for you. If you are using a Windows machine to update your clients, you will need to follow the instructions for setting up DHCP here and the instructions for setting up IIS here.
Updates between versions (e.g. 2.07 -> 2.08) can be done automatically (by putting firmware.version=latest in your ThinIT configuration file). However, some customers have been offered pre-release versions of ThinIT for testing which have the same version number as the released version. In this case, ThinIT thinks they are same version and so cannot automatically update. Each machine must therefore be updated manually (note from 2.08p2 onwards, ThinIT can be set to compare installed modules with those on the server with the firmware.refresh=y option - the upshot of this is that any module changes on the server will always be applied to the clients and so a manual update is not needed).
Version numbering scheme
The main version is in the format 2.08 (2.07 is older than 2.08 and 2.10 is newer). In addition, you may see a letter at the end (e.g. 2.08A) when looking at lists of firmware available. ThinIT is a modular product and the letter corresponds to a feature set; some example feature sets are:
- A = All
- R = RDP only
- I = ICA only
Occasionally, a minor update is released. This retains the same major version number, but has pX at the end (where X is a number), e.g. 2.08p2 is a newer patch release of 2.08, but is older than 2.09.
The update mechanism only deals with major version numbers (e.g. 2.08), it does not take into patch releases into account. Therefore, when upgrading a client and viewing a list of available versions, you will see just the main version number (e.g. 2.08). You may see references to Features, but usually the default should be chosen as you will wish to retain the same of features.
The version number reported by ThinIT when it boots (and to the centralised management software) is that of the core system and will be something along the lines of 2.07 or 2.08p2.
Performing a manual firmware update
If you have a NetManager and have ran the updates or you have completed the steps above, follow the instructions from here:
- Ensure the machine is connected to the network (ideally via a wired connection) and boot the machine.
- Depending on how the client is configured, you will either be presented with a grey or blue screen with ThinIT printed all over it (the default desktop) or your default application may launch automatically (e.g. connecting to Windows). You need to click the right mouse button on the default desktop to reveal a menu. If Windows has launched you will be presented with the Windows logon box. From here, click the Cancel button and when the logon window disappears briefly you will see the default desktop. Right click on the desktop and the menu will appear. Even if Windows re-launches the menu will remain on top.:
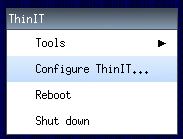
- Choose Configure ThinIT from the menu.
- You will now be prompted for a password. By default, no password is set and you can just click OK. If this fails your network manager should know what password has been set.
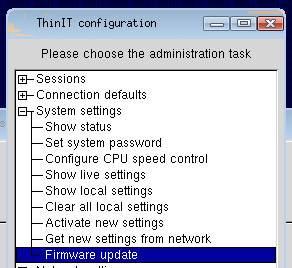
- Once logged in, expand the System menu, choose Firmware update and click OK:
- You will now be offered a list of firmware versions to choose from. All versions that have been downloaded and are available will be shown. In general you will want to choose the latest version. N.B. patch releases such as 2.08p2 will be shown without the pX at the end (i.e. 2.08) as they replace any earlier version with the same version number.
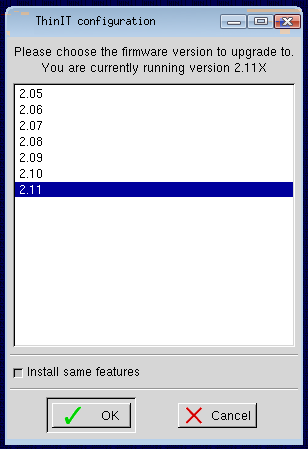
- Once you've chosen your version, ensure the 'Install same features' button is checked (unless you've been told by us to do otherwise) and click OK.
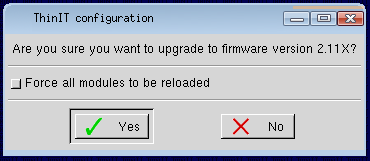
- On the next window, you will generally just click Yes to continue. However, if updating a pre-release version of software to the released version then you will need to check the box labeled Force all modules to be reloaded before clicking Yes:
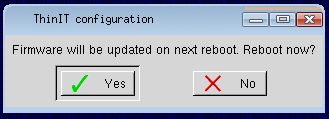
- You will now be presented with a window stating Firmware will be updated on next reboot. Reboot now?. You can either choose Yes to reboot now or No if you want to reboot later:
That is it. When the machine next reboots it will download and install the firmware update for you.
If you have any problems with this procedure or are unsure of the password set for your thin-client devices, please contact us.