


Jump To: Support > KB > NetManager > MySQL
Using MySQL
NetManager has support for MySQL built-in. MySQL is a very widely-used free database server. Built-in MySQL support allows you to easily install hundreds of software titles (especially web-based resources such as Moodle).
Creating databases can be done from webadmin by choosing Services > Databases:
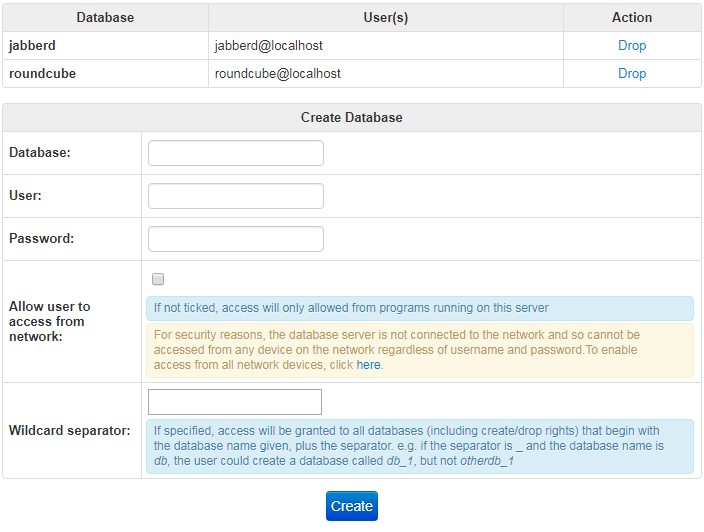
The username and password are separate from other usernames on your network, so do not reuse real usernames. It is common convention to use the name of the database as the username and then invent a secure password.
When configuring software you have installed in your intranet, you will need to specify the database name, username and password. Often you will also need to give the database server (or host). Use localhost for the local server.
Connecting remotely
MySQL doesn't actually grant access to just a username and password; it actually grants access on the basis of the tuple of username, password and client machine name. This means that even if you have given access to a certain username from the local server, you will not be able to access the database from another machine without explicitly granting access to a user on that machine.
By default, the database server will not be connected to the network at all, so will only be accessible from the local webserver. If you want to open access to all client machines, then click on the link in the warning text for the Allow user to access from network section as shown above.
If you are attempting to connect to the MySQL server from another machine, you will see errors like the following if you have not granted access to the user on that machine:
Invalid query: Host 'otherserver.school.internal' is not allowed to connect to this MySQL server
Error Number: 1130
You will see an error like the following if the database server is not configured to speak to the network at all:
ERROR 2003 (HY000): Can't connect to MySQL server on 'netmanager' (61)
The configuration tools in webadmin do not, at the time of writing, allow you to grant access to a specific machine. The Allow user to access from network tick box will grant access to the username you give from any machine. If you wish to do something more specific, you must use the backend mysqladd program when logged in as root at the command line.
The full syntax is:
mysqladd: $Revision: 1.34 $ $Date: 2020/04/14 12:35:18 $
Syntax: mysqladd [-acdlLpsuU] [-e encoding] [-o file/dir] [-r host]
        [-w wildcard] database [username <password>]
        mysqladd -D username
        -a = Add database (default) username/password required
        -c = Check whether database exists (see exit status)
        -d = Delete database
        -D = Delete user
        -e = change encoding from latin1 default (options: utf8)
        -l = List databases
        -L = List databases with permissions
        -o = Dump database(s) to given file or directory
             If a directory is given, databases will be dumped to separate files
        -p = Grant access permissions on existing database to given user
        -s = Revoke access permissions on existing database from given user
        -r = Grant access to given host, not localhost
        -u = run MySQL upgrade scripts
        -U = list users with permissions
        -w = Grant access to wildcarded database, with given separator
The -p and -r options are the important ones. The -p flag allows you to change permissions on an existing database. The -r option allows you to specify a certain client machine. Use % to grant access to all client machines. N.B. the MySQL server will do a reverse DNS lookup on the connecting IP address and then use that name when checking access. This means you cannot just use otherserver or its IP address, you must use its full domain name and there must be a reverse DNS record for it. You can test this by using the host command:
netmanager 1# host 10.0.0.2
2.0.0.10.in-addr.arpa domain name pointer otherserver.school.internal.
In this example you must use otherserver.school.internal, not otherserver, i.e.
mysqladd -pr otherserver.school.internal mydb mydb mypass
This will give access to database mydb from client machine otherserver to user mydb and password mypass. You must have created the database itself first to use the -p flag.
mysqladd -pr % mydb mydb mypass
This will give access to database mydb from all client machines to user mydb and password mypass. You must have created the database itself first to use the -p flag.