


Jump To: Support > KB > Citrix > PVS > vDisks6
Managing vDisks in Provisioning Services 6.x and 7.x
Prerequsites
You should be familiar with the Provisioning Services Console; specifically, assigning vDisks to target devices and viewing stores.
You need to know how many Provisioning (PVS) Servers you have and where your vDisks are stored. There are 2 main options:
- Single PVS server. All vDisks held in one location on its disc.
- Multiple PVS servers. vDisks must be replicated between the servers
Please note, this guide is not a complete substitute for reading and understanding the Provisioning Services 7.9 documentation.
New concepts
Instead of copying large vDisk files to create new versions and manually replicating these files to all servers, PVS 6.0 (and later) supports two major new features:
- Handling of replicated vDisks. PVS itself does not handle the replication, but it will deal with stores provided by multiple servers where not all servers will have the up-to-date copy yet
- Versioning of vDisks. Instead of having multiple independent vDisks for new versions (e.g. XenApp-1.vhd and XenApp-2.vhd) which take up a lot of space, a single base image is used and differences are maintained in separate .avhd files. There are new dialogs and machine types to deal with the maintenance, test and rolling out of vDisks
- PVS 7.7 and later support .vhdx files as well as .vhd (you make the decision which to use when creating a new vDisk). If you use .vhdx files, your difference files will be .avhdx whereas if you use .vhd, they will be .avhd.
Terminology
- vDisk - a virtual hard disc which can be used by multiple target devices. The main vDisk file is called vDiskName.vhd or vDiskName.vhdx. This is accompanied by a vDiskName.pvp file which contains settings for the vDisk. Both files must be copied or moved together. The file called vDiskName.lok can be ignored. The files will tend to be in a folder on a hard disc on the provisioning server(s). Multiple version of the vDisk can be maintained by using a file that stores the differences from the base vDisks. The base version is version 0. Version 1 will have files vDiskName.1.avhd (or vDiskName.avhdx), vDiskName.1.pvp and vDiskName.1.lok.
- Store - a collection of vDisks which can be served by one or more servers. If served by multiple servers, the paths set for the store must be available on all servers (they can be overridden for specific machines).
- Replication - a means by which a folder of data is maintained across multiple servers.
- Target Device - a specific client machine. This is defined by its MAC address and name
- Private mode - a vDisk set up to be written back to
- Shared mode - a vDisk in read-only mode where all date written will be sent to a Write Cache that will be discarded at reboot
- Versions - a vDisk can have multiple versions. Each version can be in production, test or maintenance modes. Maintenance is read-write, production and test are read-only.
- Promote - to promote a vDisk version means to change its state from Maintenance to Test to Production
- Production device - standard Target Devices which will be offered a shared mode vDisk of a specified version (usually the newest).
- Test device - a specific Target Device which is only used to test vDisks before they are put into production. Generally this will be a virtual machine. This will be offered a read-only shared copy of a vDisk. A menu will be presented at boot time with the various versions
- Maintenance device - a specific Target Device which is only used to work on updating vDisks. Generally this will be a virtual machine. This will be offered the read-write private copy of a vDisk. A menu will be presented at boot time with the various versions.
Working with versioned vDisks
Firstly a base vDisk is created in the usual way. It should be bootable both on physical hardware (if required) and as a VM (on XenServer). The vDisk is set to shared mode. At this point, target devices can be assigned the vDisk and can be used. Replication can be used to make the vDisk available from multiple PVS servers to allow for load-balancing and high-availability. The vDisk does not need to have a version name embedded in its name (i.e. XenApp or Windows7 is fine).
Once the vDisk is in shared mode, you can right-click on it in the store and choose Versions... (the option will not be there if the vDisks is set to Private Mode). The vDisk Versions window looks like this:
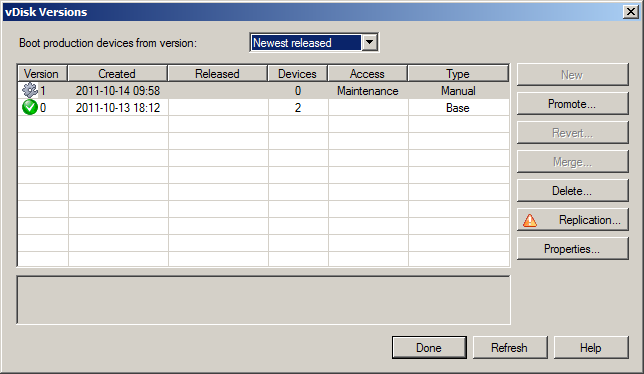
If the Access column is empty, then that version is in standard shared mode, i.e. Production.
To update a vDisk:
- Open the vDisk Versions window by right-clicking the vDisk and choosing Versions...
- You need to have a maintenance version of the vDisk. If one is not already present, then click on New. In the screenshot above, you will see that version 1 is in maintenance mode.
- Locate your Maintenance Target Device in the PVS console. This will be called something like XenAppMaster. Check it is in Maintenance Mode. If it is not, right-click on it, choose Properties and set the Type to Maintenance.
- Boot the Maintenance Target Device. You will be prompted to choose the version to boot.
- Once booted, make your changes
- If a XenApp 5 server,
XenAppPrep /pvsis run. It is likely there will be a shortcut on the desktop to do this. On XenApp 6.0 or 6.5, the machine must be rejoined to the farm (procedure described here) - Shutdown the master machine
- If you want to test the vDisk before rolling out:
- Promote the version to Test mode
- Boot a target device with that vDisk assigned and set to type Test. Choose the appropriate version when prompted
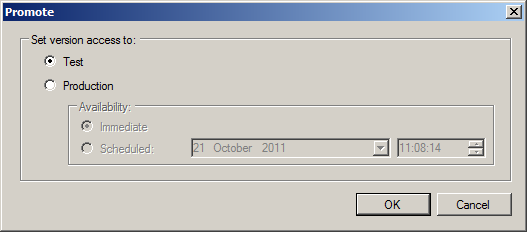
- To put the new version into production, click on the version and then the Promote button
- Select Production and Immediate and click on Done
- Give the version a helpful description by clicking on it and then clicking Properties
- If you have more than one provisioning server then you will need to replicate the vDisk version. On the server where you created the new version of the vDisk, you will find three files per vDisk version which will be named after the vDisk name followed by the version number (e.g. vDiskName.1.avhd for version 1). These will be found in the store location the server is using (this store is usually located on a local harddisc partition and will be called something like vDisks - you can check the properties of the store within the PVS console to see the physical location). One of these files will be have a .pvp file extension, another will have a .avhd file extension and the final one will have a .lok file extension. To replicate the disk, copy the .pvp and .avhd file to all other store locations (do not copy the .lok file).
- If you have replicated the vDisk to other servers/locations then you can check the status of the replication within the PVS console. To do this, right click on the vDisk within the store and choose 'Replication status'.
- Once the vDisk has been promoted (and replicated where applicable), the target devices will pick up this new version when they are next booted
- If you want to roll-back to an earlier version on your production machines alter the version in the Boot production devices from version: drop-down menu and reboot
- A version that has been promoted to Test or Production can be reverted to Maintenance or Test mode using the Revert button. Beware, this will cause any active devices using that version to be rebooted
The Promote dialog:
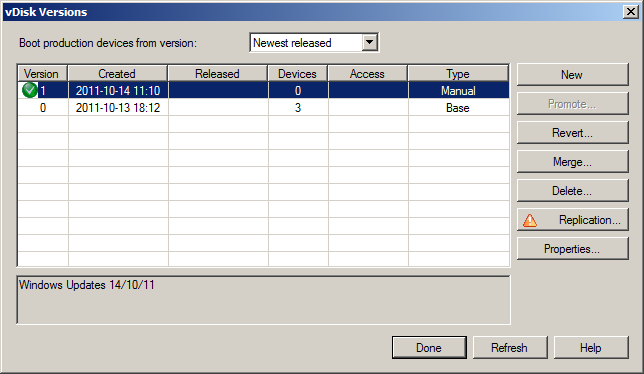
After new version has been promoted to Production:
Merging vDisk versions
Once multiple versions have been created there will be a chain of .vhd and .avhd files. So version 3 of XenApp will consist of:
- XenApp.vhd (large - base)
- XenApp.1.avhd (small - differences from XenApp.vhd)
- XenApp.2.avhd (small - differences from XenApp.1.avhd)
- XenApp.3.avhd (small - differences from XenApp.2.avhd)
This is great for maintenance purposes and for disk space usage, but can slow down access as 4 files need to be accessed to get that version's data.
If you have plenty of disk space or wish to speed up performance, you can coalesce or merge all the differences into a new base version. This is also useful if you want to copy the .vhd to create a brand new vDisk (e.g. for a different software bundle or hardware type). You cannot merge if there are any maintenance versions of your vDisk. Once you have only production versions, you can click on the Merge button to view the Merge window:
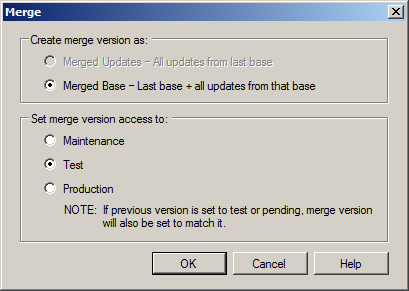
Merging will create a new version while leaving the others alone. There are two types of merge:
- Merged Updates - will merge just the updates into a new version and leave the base untouched (i.e. XenApp.4.avhd will contain all differences from XenApp.vhd rather than the intermediate versions)
- Merged Base - will create a full new base image as a new version with all updates (i.e. XenApp.4.vhd will be standalone and not rely on XenApp.vhd. There will be no XenApp.4.avhd file)
As a Merged Base version is a standalone .vhd file, it may be copied to form a brand new vDisk.