


USBInstaller
Jump To: Support > KB > Windows > USBInstaller
Creating bootable USB drive to install Windows
- First find a big enough USB memory stick (min 8GB) and plug it in. Take a careful note of the drive letter (e.g. G: for this walkthrough) and its size (e.g. 8GB)
- Get the ISO image for the Windows operating system you want build an installer for
- Mount the ISO image (can be done directly on Windows 10 and later by right-clicking on the ISO and choosing Mount, but on older operating systems we recommend Pismo File Mount
- Take a careful note of the drive letter the ISO image is mounted on (with Pismo File Mount you can choose the letter). e.g. J: for this walkthrough:

- Open an elevated command prompt, by finding Command Prompt on your Start Menu, right-clicking on it and choosing Run as administrator
- Type
diskpart, thenlist diskat the command prompt: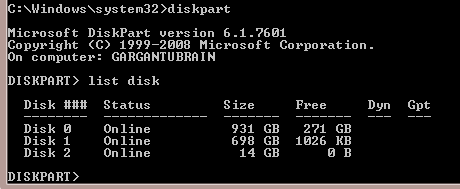
- Note the disk number of your USB drive, in the above example it is disk 2
- Type
select diskfollowed by the disk number and then typelist diskagain: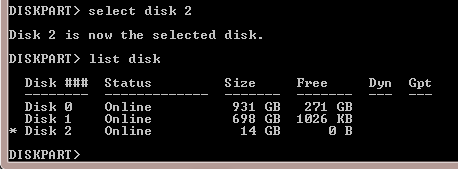
- Double-check that the correct disk is selected with an asterisk
- Type the following as separate commands into diskpart.
For MBR/BIOS:clean
create partition primary
select partition 1
active
format fs=ntfs quick label=Installer
exit
For GPT/UEFI:clean
convert gpt
create partition primary
select partition 1
format fs=fat32 quick label=Installer
exit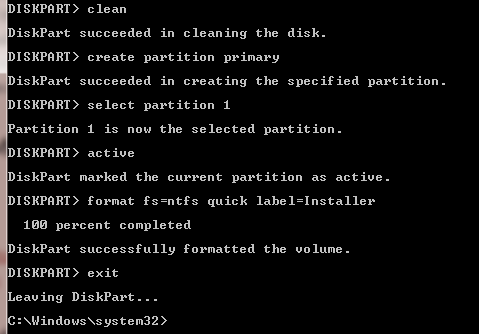
- For MBR/BIOS only, change to the drive letter of your mounted ISO image by typing the latter followed by colon (in this case J:) and then change to the
bootsubfolder withcd boot:
- For MBR/BIOS only, make the USB drive bootable by running
bootsect /nt60 G:where G: is replaced by the drive letter of your USB drive: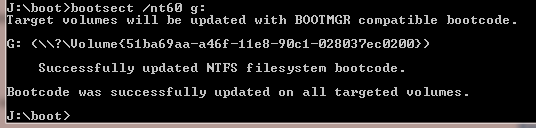
- Copy all the Windows installer files onto the USB drive with xcopy by running
xcopy J:\*.* G:\ /E /H /F /C. ReplaceJ:by the drive that your ISO image is mounted on. ReplaceG:by the drive letter of your USB drive - Wait quite a long time
- For GPT/UEFI only, you will probably see a File creation error when trying to copy
\sources\install.winas the file is too large to go on a FAT32 filesystem (which has a 4GB limit):J:\sources\install.wim -> G:\sources\install.wim File creation error - The parameter is incorrect.
To fix this usedism /Split-Image /imageFile:J:\sources\install.wim /SWMFile:G:\sources\install.swm /FileSize:4096to split the file into fragments of no more than 4GB (replacing J: and G: by the source and destination drive letters as above):C:\Windows\system32>dism /Split-Image /imageFile:J:\sources\install.wim /SWMFile:G:\sources\install.swm /FileSize:4096 Deployment Image Servicing and Management tool Version: 10.0.19041.844 The operation completed successfully.
After the copy has completed (will take a long time), you can thedircommand to check:C:\Windows\system32>dir J:\sources\install*.wim G:\sources\install*.swm Volume in drive J is CPBA_X64FRE_EN-US_DV9 Volume Serial Number is D1C4-46EA Directory of J:\sources 08/09/2022 04:25 5,011,673,968 install.wim 1 File(s) 5,011,673,968 bytes 0 Dir(s) 0 bytes free Volume in drive G is INSTALLER Volume Serial Number is C2B7-F054 Directory of G:\sources 14/11/2022 13:09 4,294,964,054 install.swm 14/11/2022 13:06 685,661,744 install2.swm 2 File(s) 4,980,625,798 bytes 0 Dir(s) 4,591,173,632 bytes free - If you have extra drivers (e.g. for disk and RAID controllers) that you will need to install Windows, you can copy them onto the USB stick into a
Driversfolder - Once completed, you can close the command line window and then eject the USB drive and your ISO image