


Jump to CustomersLinton > Linton > StaffLaptops > MDT
Build process
- Enable PXE boot in BIOS
- Boot the laptop from the network
- Press F12 when prompted to load Windows PE
- If you are presented with the Windows Boot Manager menu (this can happen if you have made additional key presses or if there are multiple boot images) choose
Lite Touch Windows PE (x64). - On the batch file menu which appears choose the option which matches the type of system that you want to build
  [1] Windows 10 driver test
  [2] Windows 10 staff laptop
  [3] Windows Desktop Lock
  [4] Windows 10 student (home use)

  [0] Manual

Select a Task Sequence [0]: 2
- Click
Run the Deployment Wizard to install a new Operating System - When prompted for the computer name use
LC-<SIMS staff code>e.g. Rita Bloxam's laptop is calledLC-RB - When the build process has finished the computer object for the laptop should already be located in the OU
OU=Staff,OU=Laptops,DC=linton,DC=internal. Verify that this is the case - Run
gpupdate /forceon the laptop to make sure that Group Policy processing has occurred before a user logs in the first time. This is very important because the Group Policy settings are what forces a local user profile - Check for additional Windows Updates and install them - disconnect the wireless connection from the system tray if using a cable, otherwise the computer may use the wireless connection to retrieve the updates
Adding new hardware
The first step is to just try installing Windows without any additional software
- Enable PXE boot in BIOS
- Boot the laptop from the network
- Press F12 when prompted to load Windows PE
- If you are presented with the Windows Boot Manager menu (this can happen if you have made additional key presses or if there are multiple boot images) choose
Lite Touch Windows PE (x64).
If Windows PE fails to get an IP address then a network driver will be required to be added to the boot media. Drivers are required to go any further
- On the batch file menu which appears choose the option which matches the type of system that you want to build
  [1] Windows 10 driver test
  [2] Windows 10 staff laptop
  [3] Windows Desktop Lock
  [4] Windows 10 student (home use)

  [0] Manual

Select a Task Sequence [0]: 1
- Click
Run the Deployment Wizard to install a new Operating System - When prompted for the computer name use any temporary name that won't collide with an existing machine
Once Windows has booted, if the network driver is missing at this stage you will get an error that the system cannot connect to the deployment share. You can cancel this message to further investigate other missing drivers
- Now check device manager for any devices which don't have drivers
If you think that something isn't right and the hardware you are trying to build should already have drivers on the build system, it maybe that the model is reported differently than previous models of the same machine - this issue is particularly prevalent with Lenovo laptops. Check the make and model which is reported by the system with the following command:
...and skip to the instructions below regarding model redirection.
Acquiring drivers
There are various methods for getting the specific drivers needed for missing hardware. Typically manufacturers actually provide multiple drivers within a driver download (e.g. when you choose to download a wifi driver you may actually be given an installer or archive which incorporates multiple drivers to cover multiple chipsets).
Try to avoid adding drivers for hardware that is not in use unless you are
sure that all drivers are relevant to a particular make and model of laptop
(i.e. you downloaded an SCCM driver pack)
A good workflow to get just the required drivers might be:
- Download the drivers from the manufacturers website
- Try to extract any individual drivers and try to install them against unknown hardware by using the driver update wizard and pointing it at specific sub directories
- For any drivers wrapped in installers, try starting them and then look in the
%TEMP%directory to see if any drivers were extracted - Try extracting drivers from installers with
7-Zip - Where you have multiple drivers and aren't sure which to use, use the installer or run a recursive scan over all downloaded files, but then use a driver export tool to retrieve a copy of the driver that was actually installed
Two tools with a GUI that can export drivers are DriverMax and DriverExtractor. Alternatively you can use the command-line tools which are built into Windows to perform something broadly similar:
dism /online /export-driver /destination:C:\drivers
pnputil /export-driver * C:\drivers
To install drivers from Windows Update when Group Policy settings have diabled this, temporarily force the driver updates back on by manually setting the policy value in the registry:
gpupdate
REM Revert the managed registry value
reg add HKLM\SOFTWARE\Policies\Microsoft\Windows\WindowsUpdate /v ExcludeWUDriversInQualityUpdate /d 0 /f
REM Restart the Windows Update service
net stop wuauserv && net start wuauserv
Once you have your collection of drivers it is a good idea to test what you have collected manually to double check you have the correct files. If you needed a network driver to get past the boot media stage just add this to the Windows PE driver folder for the moment and update the boot media, then redeploy the machine as another driver test build. Once you get to the Windows desktop try manually installing your drivers for the devices which have none. If you are pretty sure you've got the correct ones then proceed to add them...
Adding drivers to the build system
If you've got this far you've now got a your own collection of drivers which you believe to be the correct ones. Adding them to the build system (as it is configured) requires that all the drivers for a particular make and model be placed into a specific Driver Folder. Do not be fooled by the name, this is not a folder on the file system, rather it is a representation of how drivers are managed internally within MDT.
If you don't already have it you will need to get the make and model of the laptop, as reported by the laptop itself. To do this, run the command:
...and make a note of the output. vendor represents the make and name represents the model.
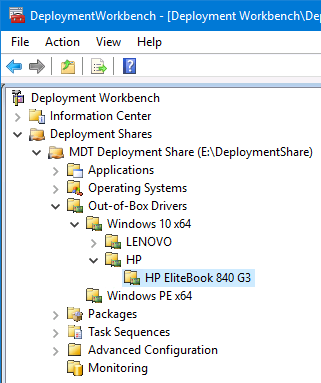
Within DeploymentWorkbench (the MDT configuration program):
- Expand
Deployment Shares - Expand
MDT Deployment Share - Expand
Out-of-Box Drivers - Expand the node for the OS version you are using (likely it is
Windows 10 x64)
At this point you should see a folder structure with laptop make (vendor) as a directory, and the laptop model (name) as a sub-directory.
If a folder exists already for the make of computer you are installing and you are only missing a few drivers, likely this new hardware is a slightly different variant of an existing laptop (hopefully this is reflected in the amount of drivers you are trying to add). Otherwise, create a new folder structure:
- Right-click the OS version folder (e.g.
Windows 10 x64), chooseNew Folder, and enter a folder name which matches the make (vendor) - Right-click the newly created folder named after the make, choose
New Folder, and enter a folder name which matches the model (name)
Now add the drivers in to the sub-folder which is named after the model:
- Right click on the folder named after the model (
name) and choose 'Import drivers' from the menu. Now locate the drivers you have prepared earlier and import them - the scan for drivers is recursive so choosing to import the top level directory of your driver collection should import them all
Adding drivers to the boot media
The process for adding drivers is the same as above but with two important exceptions:
- The only drivers which should be imported here are those for wired network cards, since the only purpose of this driver is to work within
Windows PEin order to complete the deployment - All drivers should be added directly into the folder named after the OS version (likely it is
Windows PE x64)
Once new drivers are added the boot media needs to be re-generated and updated within the WDS service:
- Right-click the
MDT Deployment Sharenode and choose the option toUpdate Deployment Share - Choose to
Completely regenerate the boot images - Click
Nextand wait for the process to complete (it may take a few minutes) and then clickFinish - Open the
WDSconfiguration tool - Expand
Servers - Expand the server name (
MDT.linton.internal) - Click on
Boot Images - Right-click the boot image you want to update and choose to delete it
- Right-click
Boot Imagesand chooseAdd Boot Image, then clickBrowse - Navigate to
E:\DeploymentShare\Bootand select the newly generated boot images (likely namedLiteTouchPE_x64.wim) - Click
Nextto use the default names and then clickFinish
Model redirection
Some laptop manufacturers (Lenovo) use the model (name) field of their laptop to represent a sub-model, build type, or regional variation. This causes issues with the type of driver matching used the build process, since %MAKE%\%MODEL% as a driver folder target isn't going to match between different laptop configurations. To work around this, firstly create a driver folder structure with the human readable model name:
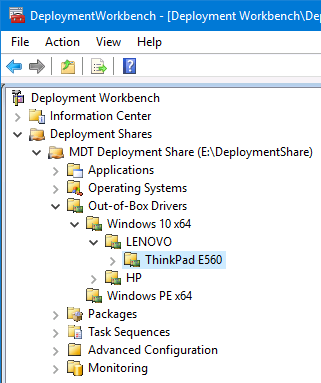
Then edit the Control\CustomSettings.ini in the root of the deployment share, and insert an INI section and entry which will manually set the variable DriverGroup001:
DriverGroup001=Windows 10 x64\LENOVO\ThinkPad E560
The ini section name should be made up of the make (vendor) and model (name), joined with a -. What would typically be referred to as the model by other manufacturers may be available from another data field, for Lenovo it is stored as version:
Note that using this approach and specifying a non-existent folder as the DriverGroup001 value seems to revert the driver installation logic to installing an matching driver that has been imported and matches a hardware ID regardless of which driver folder it was imported into. To work around this, ensure that there are INI sections which act as a pass-through where redirection isn't needed and ensure that a corresponding driver folder exists.
e.g.
DriverGroup001=Windows 10 x64\Acer\TravelMate 5742
To generate these in bulk based on the pattern of SUBDIR\MAKE\MODEL use the script available here which creates pass-through INI sections to match that pattern.
Driver installation as an application
Some drivers are not suitable for installation by the OS setup process, normally because they are for hardware devices which aren't visible until some other driver has been installed. A work-around for this is to run the setup program for the driver as if it was an application.
Each Task Sequence has an application installation task named Install a single application which says to install an application bundle. An additional task can be added before this one to allow the installation of applications which have been configured by the ApplicationsNNN and MandatoryApplicationsNNN variables, or by the application picker in the deployment wizard. The variables can be set directly based on the make (vendor) and model (name) of the computer, using the same method used to redirect the driver folder.
As an example, if a driver installation was done via an application with the GUID {2103828b-5ea9-4f49-a906-d690b2027d22}, create an INI section based on the computer's make and model, and define that GUID for the key name Applications001:
'Conexant Function Driver
Applications001={2103828b-5ea9-4f49-a906-d690b2027d22}
Given the following Task Sequence step order:
- Install multiple applications
- Windows Update (Pre-Application Installation)
- Install a single application
- Windows Update (Post-Application Installation)
...the driver application would be run at the first stage, before any Windows Updates have installed, while the main application bundle would still be installed between the Windows Update tasks.
Troubleshooting
See Troubleshooting MDT.