


Using PuTTY under Windows to create an SSH tunnel to your NetManager
What is SSH tunnelling?
There are many occasions in which it is useful to access resources and services on your corporate or school network remotely. Usually a firewall is configured which will stop free access from the whole Internet to your network. A NetManager provides secure firewalling by default meaning that all services are protected from access by the outside world. You may open up access to individual services as you see fit. To connect to a service on your NetManager, you need to configure your client (e.g. web-browser, email client) to use the external IP address of your NetManager. This approach has a number of drawbacks:
- Access to service is open to everyone unless the firewall is manually configured.
- Services which are designed to be only available internally will either not be accessible (e.g. web-based NetManager administration) or require portmapping.
- Some Internet connections (notably some LEAs) will not give you open access and thus even if you open up access to a specific service, it may be blocked by your ISP.
- All data transferred across the Internet between your home computer and your NetManager can be eavesdropped upon. This makes it possible for others to see your passwords and other sensitive information.
- There is no possibility to compress traffic.
SSH tunnelling allows you to create an encrypted connection between your local machine (e.g. your home PC) and the NetManager at the remote site. Over this single connection, you can run multiple other connections (e.g. web browsing, email). You configure your SSH client software (PuTTY in these instructions) on your local machine to listen for incoming connections on specified port numbers. Connections to any configured ports will be sent across the SSH tunnel to the NetManager. At the far end of the tunnel the NetManager then forwards the requests onto specified machines and port numbers. Both the local and remote ends of the connection are specified in your SSH client software, i.e. there is no configuration required on the NetManager.
Figure 1 below demonstrates the difference between opening up your firewall and accessing protocols directly as opposed to creating an SSH tunnel to do the same thing. The diagram is using the NetManager's web server as an example.
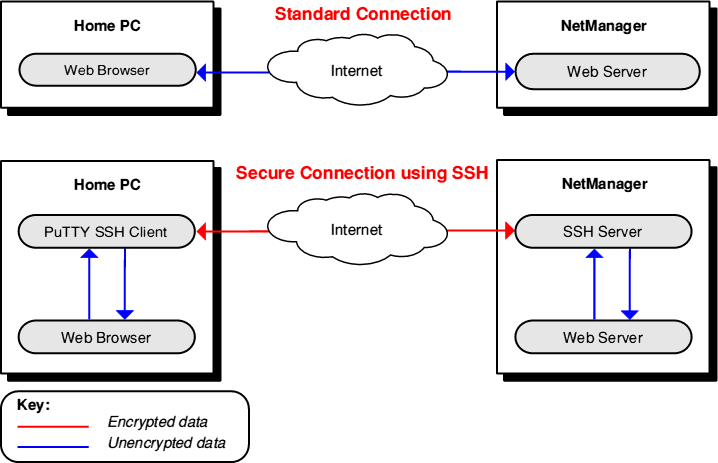
Figure 1: Example of a standard connection as opposed to a connection using SSH.
Configuring an SSH tunnel using PuTTY for Windows
- Download PuTTY from the PuTTY home page.
- Run PuTTY.
- On the window that appears (shown in Figure 2 below) select the SSH protocol and enter the address of your NetManager (e.g. intranet.demo.co.uk).
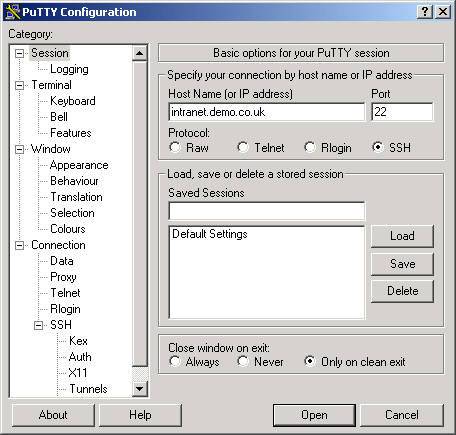
Figure 2: Screen shot of initial PuTTY window
- Click on the 'Tunnels' item under 'Connection/SSH' in the category section of this window.
- Enter a port number to listen on your local machine (source port - see Figure 3) which will forward the requests on to your NetManager.

Figure 3: PuTTY tunnelling configuration page
- In the 'Destination' box (see Figure 3) enter the address followed by a colon and the port number that you wish the NetManager to forward requests to (use localhost if you want to refer to the NetManager itself). For example, to access the NetManager's web pages you would enter 'localhost:80' or to access a Citrix server you might enter 'appserver:1494'. A list of useful ports are shown in the table below:
Port No. Service 25 SMTP Mail 80 Apache Web Server 110 POP3 Mail Server 143 IMAP Mail Server 880 NetManager web based administration pages 1494 Citrix ICA 3389 Microsoft RDP 5900 VNC (Windows or Unix display :0) - Once you have entered the source port and destination details you must click the 'Add' button.
- You may add as many source and destination details as you want. Remember to click the 'Add' button each time.
- Click on 'Open'. This will open a Window and ask you to log on to your server. Log on as 'ncadmin' or any other interactive user. If the window closes straight away when you type in the password, the account is not interactive. Use the NetManager web-based administration pages to modify the user account, so that they have an interactive account.
- Once you have logged on, the tunnelled connection will be live.
- When configuring your client software (e.g. web-browser or email package), always enter localhost (i.e. the local computer) as the remote address instead of the IP address of your NetManager. If you do not do this, the computer will connect as normal instead of over the ssh tunnel. For example, if you have configured your source port to be '8000' and the destination to be 'localhost:880', you will be able to access the web based administration system on your NetManager from a web browser on your local machine using the URL 'http://localhost:8000/'. Similarly, if you have specified the source port as '1494' and the destination as 'appserver:1494', you will be able to configure the Citrix ICA client to connect to 'localhost'. The NetManager at the other end of the ssh tunnel will forward the traffic to machine 'appserver' on the remote network.