


Jump To: Support > KB > NetManager > Network > Addresses
IP Addresses
Each network card in the NetManager can have multiple IP addresses assigned. Generally however, each card will only have 1 and these would all be on different IP address ranges. Extra IP addresses can be added with Aliases.
If you have a multiple cards which are attached to different IP address ranges, then the NetManager will route traffic between those ranges (as long as the client computers have their default gateway set to the relevant local NetManager IP address), i.e. it will act as a Layer 3 router. Traffic routed through the NetManager may be firewalled.
Alternatively, you can use NAT between multiple cards which will hide one IP address range behind another.
You should NOT have the same IP address range assigned to multiple network cards.
Viewing settings
All NetManager settings can be seen by going to System > Settings in webadmin. Alternatively, more detailed information on the network interfaces present in the machine along with assigned IP addresses, media status (i.e. link speed and duplex state), MAC addresses, etc. can be found on the Network > Interfaces page.
Configuring
IP addresses need to be configured from the Console Menu so that connectivity is not interrupted. Go to option N (Network configuration) followed by option A (Configure interface addresses). You can configure main IP addresses and Aliases from here.
If changing addresses, you may find it useful to have a copy of the current settings as mentioned in the section above. Also, multi-configuration switching will allow to backup the current settings in case you need to revert.
To alter/set an IP address, you first need to pick the network interface to configure. The list of interfaces and current settings will be useful here.
When option A (Configure interface addresses) is chosen, you will see a list of network interfaces in your machine:

Interfaces which have no IP addresses configured are shown as Not Configured., interfaces with one or more IP addresses are shown as Configured.. Pick the interface you want to change. Current settings (if any) will be shown:
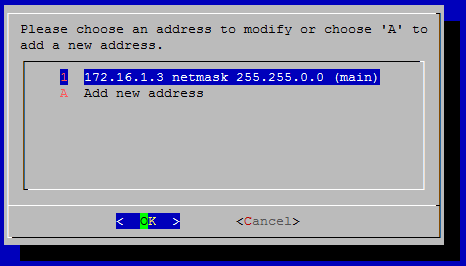
To change or delete an existing address, just hit Return when the IP address is selected. To add an extra IP address choose option A (Add new address). You will then be asked how you wish to specify the IP address:
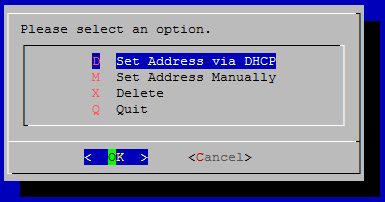
The 'main' network interface in the machine cannot be unconfigured, nor can it be set to use DHCP, so those options will be removed when altering that interface. Otherwise, just choose D (Set Address via DHCP), M (Set Address Manually) or X (Delete) as appropriate.
Configuration file settings
interface_internal- the name of the main network interface on your LANinterface_additional- all other physical network interfaces, even if disconnected. Virtual interfaces such as VLANs, point-to-point tunnels (tun), tap, bridges or aggregated links (agr) should not be listed hereiface_INTERFACE_ip(e.g. iface_wm0_ip) - the IP address on the relevant interfaceiface_INTERFACE_sm(e.g. iface_wm0_sm) - the subnet mask on the relevant interfaceiface_INTERACE_type(e.g. iface_wm0_type) - usually left to the default of static, set to dynamic to use DHCPiface_INTERACE_aliases(e.g. iface_wm1_aliases) - a comma-separated list of IP -SPACE-subnet pairs (e.g. 192.168.1.34 255.255.255.0,192.168.1.35 255.255.255.0)