


SAN-Migration
Jump To: Support > KB > IBM > SAN > Migration
SAN migration
- Shutdown VMs and power down hypervisors
- Remove fibre leads from old SAN, note which sockets they were connected to
- Remove network leads from old SAN, note which sockets they were connected to
- Power off old SAN and remove from rack, place within 2m of the rack
- Fit new SAN in rack. A FlashSystem 5000 should fit in the same rack rails as a V3700, but this is not guaranteed
- Connect network leads to new SAN. LAN ports should be connected to the left-hand port (number 1), not the one with a white box around it.
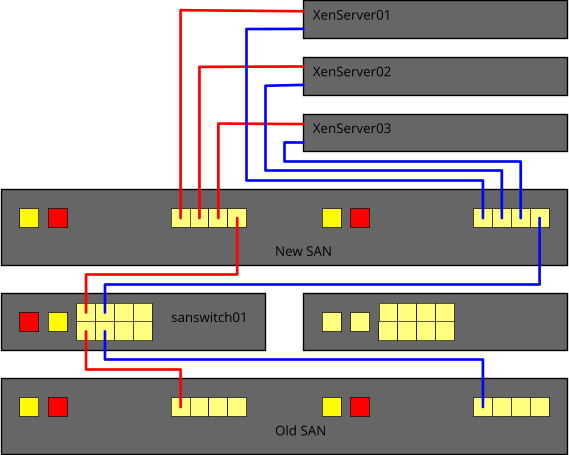
- Connect fibre leads from hypervisors to SAN, they should be connected so that host 1 connects to port 1 on each controller, host 2 to port 2, etc.
- Connect LAN network leads to old SAN (left-hand port on each controller)
- Connect LAN network leads to SAN switch (2nd port along that says MGMT 10/100 above it)
- Power up old SAN, new SAN and SAN switch
- Check for network connectivity to all items
- Use 2m (aqua) fibre leads to connect port 4 from each controller on new SAN to ports 1 and 3 on SAN switch
- Check for fibre link lights. On new SAN there should be two lights lit above each port 4. On switch the left-hand link light underneath the ports should be lit
- Use 1m (orange) fibre leads to connect port 1 from each controller on old SAN to ports 2 and 4 on SAN switch. These leads are not keyed, so looking from the rear connect the red connector to the left (on the switch the cable go upside down)
- Check for fibre link lights. On old SAN there should be two lights lit above each port 1. On switch the second link light underneath the ports should be lit. If not, swap the red and black connectors at one end
- Power on the hypervisors. Do not attempt to start any VMs and do not worry about errors in XenCenter
- You can now contact Precedence to start the migration
- Once the migration has completed, you can unplug the fibres from the new SAN to the SAN switch and power down the old SAN and SAN switch