


XenServer-UpgradeManual
Jump To: Support > KB > Citrix > XenServer > UpgradeManual
Manual rolling pool upgrade
Usually, doing an automated rolling pool upgrade is the easiest way to upgrade your XenServer pool(s). This is done by using a central installation on the network (NFS, FTP or HTTP). Under some circumstances, you may need to do a manual upgrade where you boot each host into the upgrader one at a time. Reasons why you might need to do this:
- You don't have the network infrastructure to host a central installation repository (easy with NetManager, tougher on a Windows-only network)
- You have VMs using local storage that cannot be migrated and that you need to keep running for as long as possible (automated upgrade would suspend them). Examples are worker VMs for VDI that have write caches on local disks.
- You have VMs that are not virtualisation aware so cannot be live-migrated
Procedure
- Within XenCenter, pick Rolling Pool Upgrade... from the Tools menu
- Read the warning and click Next >
- Tick the box next to your XenServer pool and click Next >
- Select Manual Mode - manual upgrade from CD-ROM or PXE and click Run Prechecks:

- If all checks are OK, click Next >
- The upgrade plan will be displayed showing which servers will be upgraded and in what order. Click Next >
- The upgrade process will start and when a server needs rebooting, a window will be displayed asking for you to prepare it (e.g. by ensuring the XenServer CD is in). Take careful note of which server it is going to reboot, it might not be in the order you expect!:
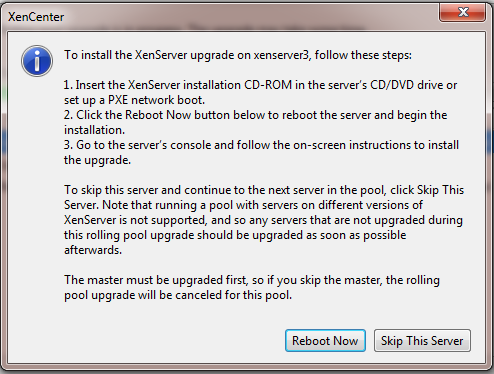
- Go to the server console to run through the manual upgrade process:
- Boot from the right location (e.g. CD) which may require a key to be pressed as the machine starts up
- As the CD boot starts, you may see a prompt saying The boot sections on your bootable CD-ROM are: 0. DEFAULT. If so, just hit Return and wait for it to boot
- Pick
[qwerty] ukon Select keymap screen - Pick
Okon Welcome to XenServer Setup - Wait while Checking for existing products... is displayed
- Pick
Accept EULA - Check that
Upgrade XenServeroption is present on menu. If you only seePerform clean installationandRestore Backup, do NOT proceed. Similarly, if you see a screen saying Only product installations that cannot be upgraded have been detected, you should NOT proceed without further guidance. - Pick
Upgrade XenServer X.x.x-xxxxxx(the old version number will be displayed at the end) - Select
Continuewhen prompted to create backup - If booted from CDROM, select
Local mediaand selectOk - Pick
Verify installation sourceand selectOk; it takes a bit longer, but means that a faulty CDROM or DVD drive won't break the upgrade - Pick
Okif no faults were found - Pick
Install XenServerand wait for installation to complete - When asked if you want to install supplemental packs, select
No - Pick
Okon Installation complete screen to reboot
- You may then return to XenCenter and wait for the newly-upgraded server to reboot and reconnect
- Reboot rebooting and updating the servers as prompted